Operation
- Press the PRESET 1 button to preset the timer to the desired count down time “2:30”.
- Pressing the Start button will start the timer counting down.
- Pressing the Start button while the timer is running pauses the timer.
- At anytime, the PRESET 2 button can be pressed to set the count down time to time stored in preset 2. It will automatically start counting down from the stored preset time.
- At 10 seconds, the horn generates a short beep every second until the timer reaches 0.00.
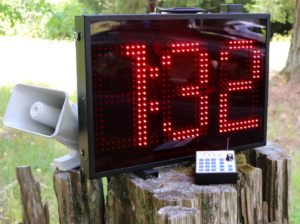
- At 0.00 the horn sounds for one second. The heat number “032” will be advanced at this time.
- When clock reaches “0:00”, the heat number is displayed.
Setup
- Connect the large horn to the horn connector on the display.
- Connect the large LED display to a 12 volt car battery or 12 volt DC power supply. Be sure that the red lead is connected to the battery positive terminal and the black lead is connected to the battery negative terminal.
- Install batteries in the KP219A remote keypad or power the keypad from AC power using the provided wall transformer.
- Setting up the display. Mount the display securely where it is easy to see.
- Connect the horn to the connector on the rear panel of the display.
Setting up the stored presets for PRESET 1 and PRESET 2.
- Press the Preset 1 button. The currently stored time “2:30” will be displayed. If auto-run is enabled, the timer will automatically start counting down.
- If the timer is running, press the PAUSE button to pause the timer.
- Turn the knob to select the desired time.
- If you want the timer to automatically start running, press the RUN button to start the timer running.
- Press and hold the PRESET 1 button until the display blinks with dashes “---”. The new time is now stored.
- Repeat the above procedure for PRESET 2.